Monday, June 30, 2014

Potato Salad - I saw it on Pinterest

6/30/2014

Yesterday was my sister's second day living in her newly renovated rental place. She had a few people over and wanted to make a potato salad. Unfortunately neither of us know how to make it :D. I found this recipe on Pinterest and we tweaked it a bit to fit our needs (i.e. less mayo, no bacon, more celery, etc.). It turned out really delicious and we cut a bunch of the mayo, so it was not as bad as it could have been. Yummm. Our recipe made about 6-8 large servings, or 8-10 small servings.


My version


Pinterest/All Recipes version


Materials
- Small red-skinned potatoes (we used about 12-15 potatoes)
- 4 eggs
- 2 celery stalks, finely sliced
- 1/2 onion, finely diced
- 1 cup mayo
- Salt/pepper to taste

Steps
Step 1: Boil salted water in a large pot. Once boiling, drop in your potatoes. Let them boil until tender but still firm (about 15 minutes)

Step 2: While your potatoes are boiling, make 4 hard boiled eggs. We used a handy hard boiled egg maker that goes in the microwave. If you don't have this, use whatever strategy you normally use to make hard boiled eggs.

Step 3: Once the potatoes are done, strain them (pour the pot of potatoes AWAY from your body to avoid spilling the boiling water on you), and put them into the fridge.

Step 4: Once the eggs are done, put them into the fridge with the potatoes to cool. 

Step 5: Wait about 15-20 minutes for your items to cool. While they cool, start chopping your onion and celery and gathering your other materials

Step 6: Once the potatoes and eggs are cool, but not cold, take them out of the fridge. Cut the potatoes (leave skin on) into chunks, about 1/2-1 inch in size. Peel and cut the eggs into small chunks (smaller than the potatoes). Put them into a large bowl.

Step 7: Put the chopped celery and onion into the bowl. Mix.

Step 8: Pour your mayo into the bowl. Season with salt and pepper. Stir until mixed.

Step 9: Cool in the fridge. The original recipe calls for one hour. We got away with 15, but I would suggest at least 30 minutes if possible!


Overall I give this Pinterest makeover 4 stars! It was more work than I usually put into cooking, but it turned out delicious and it was a big hit with everyone.

Thursday, June 26, 2014

DIY T-shirt Re-fashion (No sew): I saw it on Pinterest

6/22/2014

I found this AMAZING blog by a woman who is the Queen Sheba of t-shirt re-fashions on Pinterest. I found this particular style on her blog and thought I would try to emulate...

My version


Pinterest version:


Materials
- T-shirt (I used a Small Fruit of the Loom because I wanted mine a little more form fitting. I suggest using Hanes, their t-shirts are softer.)
- Scissors
- Chalk or fabric marker

Steps
- I followed the exact steps found on the blog by WobiSobi.

Use chalk to mark the cuts you want to make. Make sure to put a piece of cardboard or sewing board between the two sides of the shirt so you don't accidentally cut the other side.

Pinch the fabric in the middle of your line to start cutting. Use big scissors strokes to cut as straight as possible up and down each line.

Turn to the back. Use the chalk to outline the shape you want, then use a straight edge to draw your lines.

Cut the lines on the back of your t-shirt.
Overall, I give this t-shirt redo 4 1/2 stars. The t-shirt I used was of a slightly stiff material, so the fabric does not lay as nicely as I would like. Otherwise I think this is a funky re-fashion that is so simple!

Thursday, June 19, 2014

DIY Printed T-Shirt (No sew optional): I saw it on Pinterest

6/20/2014

This is another hybrid craft...it's based off an idea I saw on Pinterest, but some of the ideas are my own (believe it or not)! Here is how I made the coolest shirt ever...


My version


Below I will give the directions for both the simple sew and no sew options for the shirt. If you want to make a shirt that will last perhaps a bit longer and look store bought, do the sew version. If you want a more rugged, home-made look, go with the no sew option!

Materials
- Men's solid-colored undershirt (mine was Fruit of the Loom, size Small....If you want a baggier look, go with a size bigger. Also, I recommend Hanes, their shirts tend to be softer than Fruit of the Loom)
- Bleach in a spray bottle
- printer
- thick paper (cardstock or photo paper) or stencil
- X-acto knife
- scissors
- chalk
(sewing)
- sewing machine
- matching thread
- straight pins

Steps

Step 1: Lay your shirt out and use the chalk to mark where you want to cut your shirt. If you are doing the sew version, make sure to leave enough room for your seam.

Step 2: Using sharp scissors, cut along your line using large strokes. Make sure that the top lines up straight. As you can tell in mine, I did not cut the neckline. If you want to cut yours, go for it!

For NO SEW: stop here. Return at step 5.

Step 3: Using the straight pins, pin the seam down however large you want. I did a small seam because I did not leave enough allowance. Best practice is to fold the seam over twice, then pin. Try to make sure you have the same size seam all the way around. 

TESTING SAMPLE
**Note: my shirt was gaping on the sides, so I made a small pleat in my seam on both sides to help pull that in.

Step 4: Sew your seam down.

Step 5: If you are doing a stencil, skip this step. Otherwise, go onto your computer and choose the logo you want to have on your skirt. Copy and paste the symbol onto a word document. I HIGHLY recommend that you start by print a small version to test on the sleeve of your cut shirt. I did this in order to see how the bleach sprayed and how much I would need. Print out the sample, black and white, on the thick paper.

Step 6: After testing your sample by following steps 7 - 9, re-size your picture to whatever you would like and print again.

Step 7: Use the x-acto knife to cut out your picture. You don't have to be too perfect because the shirt isn't meant to be perfect!


Step 8: Place a couple of small pieces of rolled tape on the underside of your cut out symbol. Lay your shirt down flat in a bleach-safe area (i.e. outside in bark, cement) and put your symbol onto your shirt. Push down so the tape is really on there. A step that I missed, but wish I had done, was to put a piece of cardboard or something between the two layers of my shirt...some of the bleach bled onto the back.

Step 9: Step back and spray! I started with two sprays, waited, then sprayed once more around the symbol in a spot that I had really missed. You don't want it perfect, so some imperfections are great. After first spraying it will seem like nothing is happening....just wait! It takes a solid 30-45 seconds for the bleach to really start showing itself. Be patient before you get crazy with the bleach.

Step 10: Take a step back and spray one or two more times towards the bottom of the shirt to give it that splashed look.

**Note: wear janky clothes. I got a bleach mark on my dress :S

Step 11: Let dry. It seemed to dry very quickly, but I still waited about 24 hours before washing this baby. I washed it on cold, but I am confident that next time I can wash it with all of my clothes and have no problem!

This is a SOLID 5 star redo! I absolutely love this shirt and have worn it numerous times! People have actually thought I bought it...woohoo! I highly recommend this craft and it is seriously SO easy! DO IT!

Sunday, June 8, 2014

Well, hello!

Hi! My name is Shannon Eller and I love buying treasures at thrift shops and yard sales. I am by no means a professional at refurbishing items, but I enjoy doing it! I started when I bought a house last August. I decided I needed to fill my house up with "stuff" without becoming completely broke. Hence, thrift store and yard sale shopping. I also stink at blogs, well, technology in general. So, I apologize if this blog doesn't turn out as wonderful as Amber's entries.

Speaking of Amber, she is my awesome cousin! Although we live far apart, we discovered that we both like crafts and cheap crap from yard sales and thrift shops. Amber generously allowed me to be a guest author on her blog. So, every now and then I will be posting my finds. Hope you enjoy!

Here is my latest project: Reupolstering this chair!

I found this little gem at a yard sale a couple weeks ago. It was an awesome score. The lady had TONS of antiques and collectibles. She was selling everything and told me she began her "hoarding" in the late 80's. She said that she would buy antiques and sell them at fairs and festivals, but it is no longer profitable.

She was selling this chair for $25, but I talked her down to $15.

The fabric was left over from one of my other projects (got the fabric at Joann's for $4.68)

And I only used a staple gun to attach the fabric. I borrowed the staple gun from my dad.

So, here it is! Now the chair is sitting next to the wood stove by the doorway so my husband will HOPEFULLY take off his boots at the door and not track mud throughout the house!


BEFORE:


AFTER: This took me about 20 minutes.


Guest Author!

6/8/2014

I am happy to announce a new guest author to my blog.... my outstanding cousin, Shannon! She lives hundreds of miles from me, but we are kindred crafting souls! She will be posting some truly fabulous crafts and thrift store re-dos. Welcome, Shanny! Can't wait to see what she does :)

Friday, June 6, 2014

DIY Terrarium: Small Edition - I saw it on Pinterest

6/6/2014

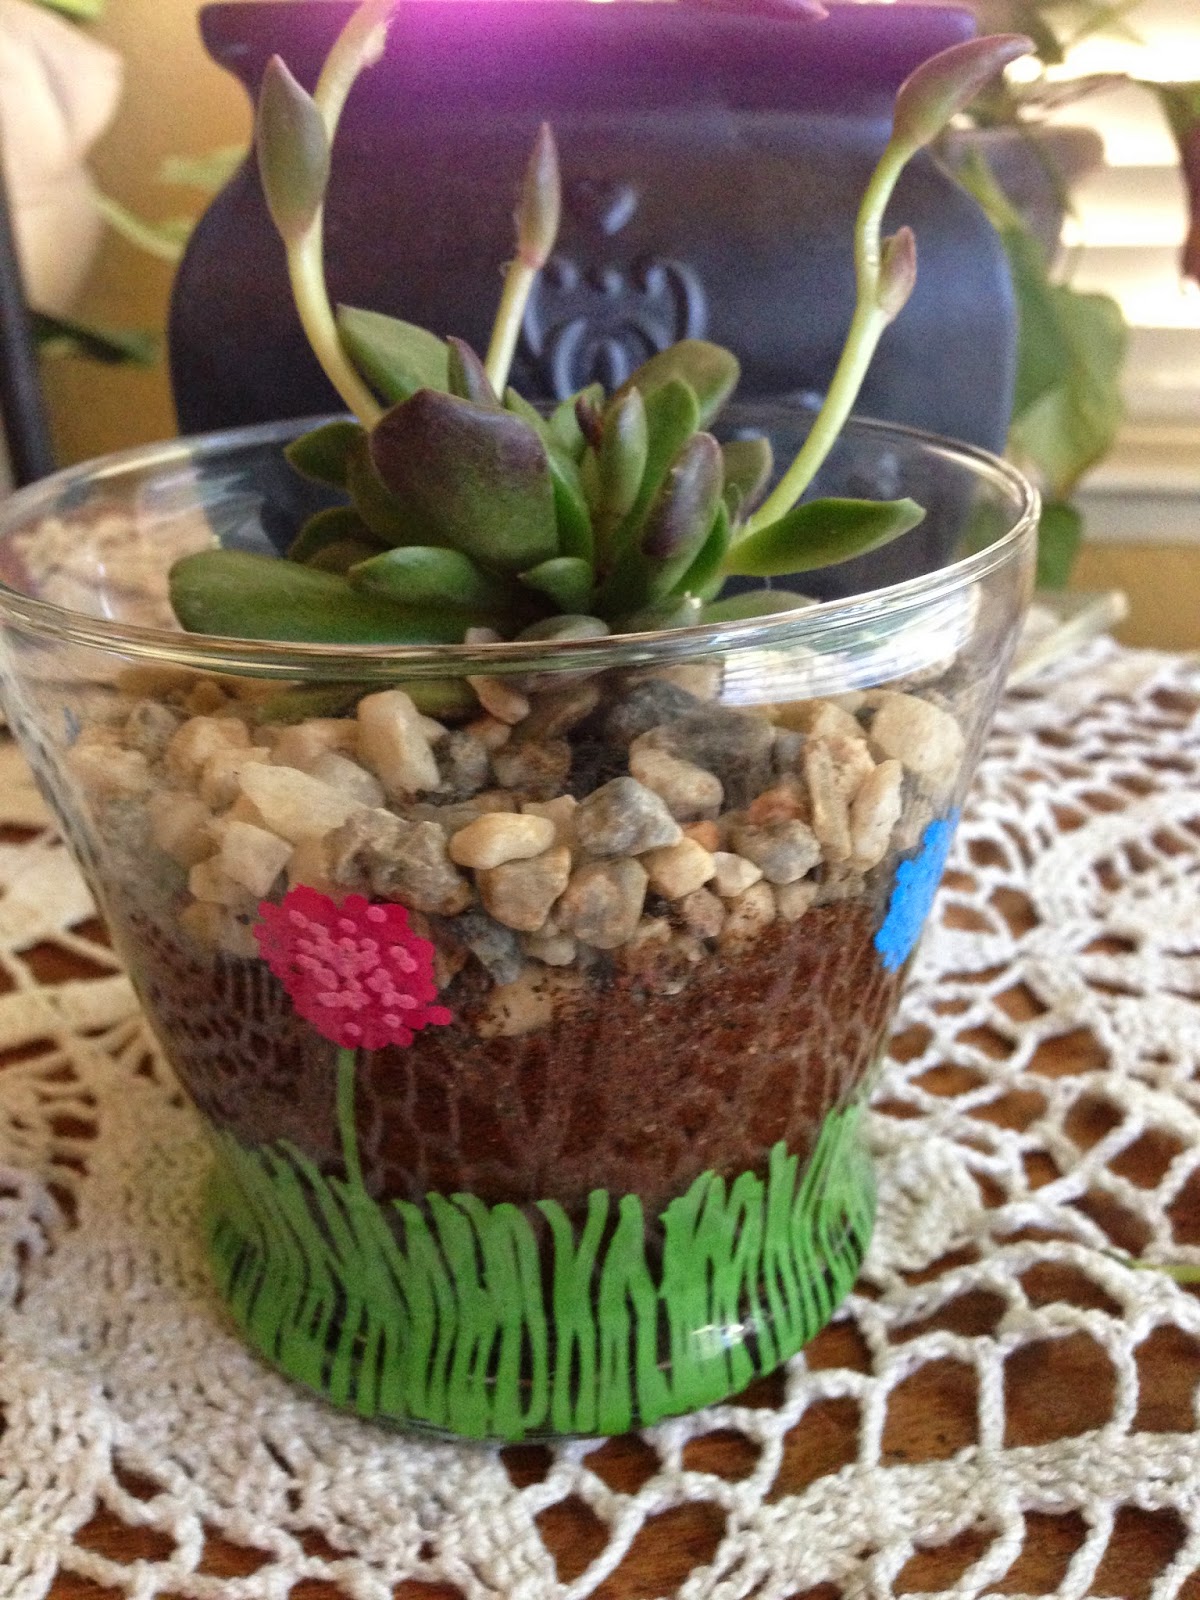
After making the Mother's Day large terrariums, I was convinced that these would be the perfect end-of-the-year gifts for my fellow teachers and staff members. Obviously I could not make each one their own gigantic terrarium for monetary purposes, but I thought a small, personal-sized succulent would be just perfect! I adapted a few different Pinterest ideas into one...


My version


Pinterest versions


http://lettersfromlala.com/makeyourownsucculentterrarium/

http://www.hometalk.com/3614421/teacup-succulents

http://purplebutterflykisses.wordpress.com/2013/10/27/decorated-vases-sharpie-paint-markers/

Materials
- clear containers (I found mine at the dollar store in the candle section)
- paint markers/metallic sharpies
- charcoal (found at your local nursery)
- cactus soil
- pebbles
- small succulents (look for the $1.98 size at your local hardware store!)


Steps
Step 1: Use windex to clean out your clear container, if necessary.

Step 2: Using the paint markers, make whatever design you fancy on the bottom half of your container.

Step 3: Make sure that dries completely, then beginning the planting process. Start by pouring a 1/2 inch layer of charcoal across the bottom of your container.

Step 4: Re-plant your succulent directly into the container, on top of the charcoal.


Step 5: Holding your succulent and covering the top so soil doesn't get into your succulent, pour dirt carefully around the edge of the succulent until the soil is almost even with the top of the pre-planted succulent dirt. 


Step 6: Pour a thin layer of pebbles over the soil, covering completely. Again, use your hand to cover the top of the succulent so no pebbles go into it.

Step 7: Water, just enough to make the soil slightly damp. Water 1x/week and place in indirect sunlight.


These turned out exceptional! My co-workers were so surprised and happy to receive such a personalized, unique gift. I give this Pinterest redo a big time 5 stars! Here are a few more pictures of the designs and finished products:


Thursday, June 5, 2014

DIY Terrarium: Large edition - I saw it on Pinterest

6/5/2014

I saw these on Pinterest and thought they would be a great Mother's Day gift, and I was right! These turned out so adorable and all of the mothers we gave them to thought they were great. Cheap overall, handmade, and so easy to maintain!


My version


Pinterest Version


Mine turned out slightly different from the example, but I will explain how to remedy that so they look a little more similar to the Pinterest version.


Materials

- Clear containers (we got ours from Home Goods for $10/each)


 - Succulents (Here is where we went wrong...since this was the first time my sister and I were doing this, we bought small succulents, but not small enough! They sell tiny little succulents at your local hardware stores and nurseries for around $2...these are the size you want. Because ours were slightly too large, we had to add more soil so they sat higher in the containers. You would need less soil with smaller succulents, therefore allowing yours to look more like the sample!)


 - Charcoal (find at the local nursery) - this is imperative for draining!


- Cactus soil

- Pebbles


Steps


Step 1: Clean your clear container with windex.


Step 2: Pour about 1/4 inch of charcoal into the bottom of your container.


Step 3: Pour a small layer of dirt over the charcoal, just enough so you no longer see the charcoal.


Step 5: While holding the succulent in place, pour dirt all around the roots to hold it in place. Fill with dirt until your dirt is just about even with the top of the pre-planted dirt and roots. Be careful to keep your hand over top of the succulent in order to prevent dirt going into its small crevices.

Step 6: Flatten and smooth out dirt, making sure it is even.

Step 7: Pour a layer of rocks over the dirt, covering in all places. Again, be careful to cover the top of the succulent.


Step 8: Water, enough that the dirt is damp.


I give this Pinterest makeover a 4 star redo. I think if I were to do it again, I would know how to make it better and would give it a 5! Per mother, this project evened out to about $25/person. Outstanding! :D